Usage
OLED display
Top line
Left: Time since power-on (not shown on small displays).
Right: Overall average radiation since power-on.
Middle area
Current CPM (counts per minute) displayed using a rather big font.
Bottom line
This is a status display with 8 positions, numbered 0..7:
Rules of thumb:
.usually means “off” or “unused”.- if you see some number (
0..7) within the status display line, something went wrong.
Positions:
- 0: WiFi
A: AccessPoint activew: WiFi client trying to connectW: WiFi client connected0: some error happened
- 1: sensor.community transmission
.: off (not configured, not enabled)?: init (enabled, before 1st transmission)S: sendings: idle (shown after successful sending)1: sending failed (shown after trying to send)
- 2: madavi transmission
.: off (not configured, not enabled)?: init (enabled, before 1st transmission)M: sendingm: idle (shown after successful sending)2: sending failed (shown after trying to send)
- 3: TTN (“The Things Network”)
.: off (not configured, not enabled, no LoRa hardware)?: init (enabled, before 1st transmission)T: sendingt: idle (shown after successful sending)3: sending failed (shown after trying to send)
- 4: BLE (Bluetooth® Low Energy)
.: off (not enabled)?: init (enabled, before setup of BLE service)B: connected and sending notifications, if requested by connected deviceb: connectable (advertising and ready to connect)4: BLE error
- 5: unused
- 6: unused
- 7: High-Voltage Capacitor charging
H: OK7: failure to charge HV capacitor
ESP32 buttons
The MultiGeiger ESP32 microcontroller board has 2 buttons:
- RST: reset (restarts device)
- PRG: program (press and hold PRG, press RST momentarily, upload firmware)
Often, using PRG is not needed for flashing firmware, because it “just works” when using the right tools.
DIP Switches
Optionally, the MultiGeiger can be equipped with a 4-contact DIP switch under the ESP32 microcontroller board.
The firmware makes use of these 4 switches as defined in the Switches data type in switches.h:
- SW0: Speaker on
- SW1: Display on
- SW2: LED on
- SW3: BLE on
BLE - Bluetooth® Low Energy
BLE Heart Rate Service
The MultiGeiger provides a Bluetooth® Low Energy (BLE) service to allow the collection of the Geiger-Mueller count rate via a GATT Heart Rate Service (Service UUID 0x180D). The following characteristics are used:
- 0x2A37 (‘Heart Rate Measurement Characteristic’):
- The first byte is a collection of status flags, according to the service’s standard
- ‘Heart Rate Measurement’ as 16 bit value (little endian), corresponds to Geiger-Mueller counts per minute (CPM)
- ‘Energy Expenditure’ as 16 bit value (little endian), represents a rolling packet counter
- 0x2A38 (‘Heart Rate Sensor Position Characteristic’)
- ‘Sensor Position’ as 8 bit value, corresponds to TUBE-TYPE, allowing the conversion of CPM to radiation rate
- 0x2A39 (‘Heart Rate Control Point Characteristic’)
- Write characteristic, required by service’s standard to reset Energy Expenditure to 0. Writing 0x01 resets the rolling packet counter to 0.
Testing BLE
Any decent Bluetooth® scanning app should be able to connect to the device and show the notification values.
The MultiGeiger companion app was specifically made for the MultiGeiger.
There are also some generic apps:
Any other heart monitor app / device should be able to connect to the MultiGeiger, too.
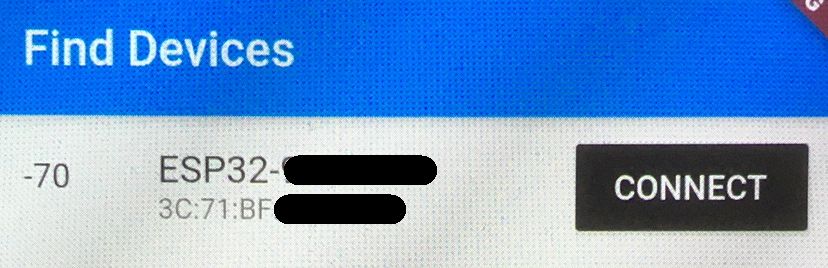
- Figure 1: Connect to the MultiGeiger with the name ‘ESP32-<id>’, where <id> should be the same ID (7 to 8 digits) as with the access point to set the device up initially.
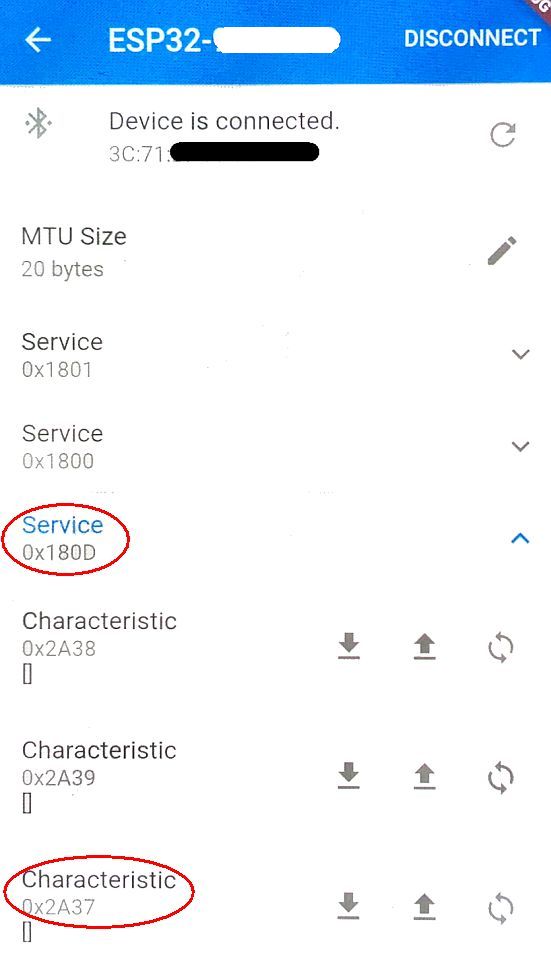
- Figure 2: Find the correct service (UUID 0x180D) and, if needed, load / open characteristics.
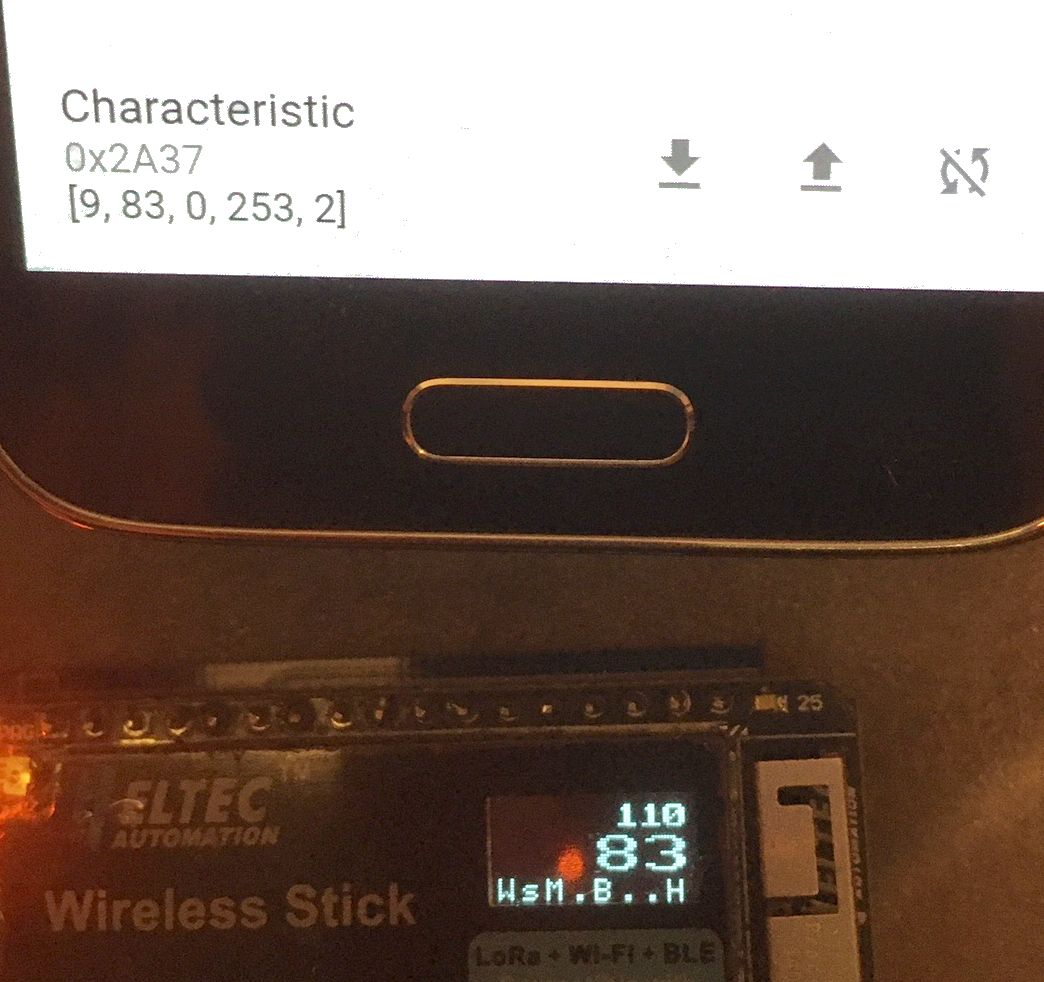
- Figure 3: Find the Heart Rate Measurement Characteristic (UUID 0x2A37) and click on the icon to start notifications.
While testing, please keep in mind that an update packet is sent only every ~10s (along with a display refresh, if enabled). If a WiFi transmission is blocking display and BLE updates, the interval may be even longer. So it might take a while until a reaction with actual data can be seen in the app.
Fig. 1
|
Fig. 2
|
Fig. 3
|